A Wavlink WiFi repeater can help if your WiFi connection is weak in certain rooms. It sends the signal from your router farther, so you have robust WiFi in every corner of your house. In this simple 2025 guide, we’ll show you how to complete the Wavlink repeater setup in just a few easy steps.
You don’t need to be an expert. This guide is written for beginners. Just follow along, and your WiFi will be better in minutes.
What Is a Wavlink Repeater?
This is a small device called a Wavlink WiFi repeater or range extender. It helps to boost your WiFi connection. It connects to your main router and then sends the information to different parts of your house.
If you often lose connection in the bedroom, upstairs, or garage, using a Wavlink repeater setup can fix the problem.
Now let’s see what you need before starting the setup.
Step-by-Step Wavlink Repeater Setup (Web Browser Method)
This is the most common method used by most users.
Step 1: Plug In the Repeater
Plug your Wavlink repeater into a power socket near your router. Wait for the LED lights to turn on. This may take 30–60 seconds.
Step 2: Connect to Wavlink WiFi
On your phone or laptop, go to WiFi settings and connect to the network called WAVLINK-N or WAVLINK_EXT (depending on your model).
No password is needed at this point.
Step 3: Open Setup Page
Open a browser and type this in the address bar, 192.168.10.1 or ap.setup. This will take you to the Wavlink setup page.
Step 4: Login to Admin Page
You will be asked for a username and password. Default values are usually: Username: admin, Password: admin. Now click Login.
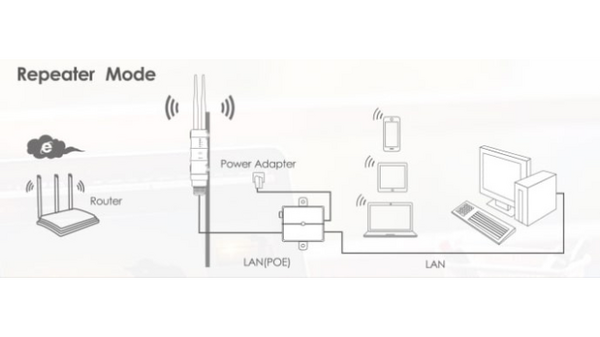
Step 5: Choose Repeater Mode
On the setup screen, select Repeater Mode (sometimes called “Range Extender Mode”). The repeater will scan for nearby WiFi networks.
Step 6: Select Your WiFi Network
Choose your main WiFi network from the list. Enter your WiFi password when asked.
Step 7: Complete Setup
Click Apply or Save. The repeater will reboot. This may take 1–2 minutes. After that, it will start boosting your main WiFi signal. Now your repeater is ready to use! Let’s test the connection.
Step-by-Step Wavlink Range Extender Setup (WPS Method)
This is the fastest method for your wavlink router login via WPS button.
Step 1: Plug in the Repeater
Place the repeater near your router and plug it in.
Step 2: Press WPS on Router
Find and press the WPS button on your router. Hold it for 2–3 seconds.
Step 3: Press WPS on Repeater
- Now press the WPS button on your Wavlink repeater within 2 minutes.
- The LED light will blink and then turn solid. This means the devices are connected.
WPS setup is complete. You can now move your repeater to the desired location.
Where to Place Your Wavlink Repeater
To get the best performance from your Wavlink range extender setup, location is key.
Best Location Tips:
- Place it midway between your router and the area with weak WiFi.
- Avoid walls, microwaves, or metal items.
- Keep it off the ground and in an open space.
- The better the placement, the stronger the signal you will get.
How to Check If you’re Setup Was Successful
After setup, check the repeater’s signal:
- Go to WiFi settings on your phone or laptop.
- You should see a new network name like YourWiFi_EXT.
- Connect to it using your regular WiFi password.
If the internet works and the signal is strong, your setup was successful. If it still doesn’t work, don’t worry we’ll show you how to fix it.
Troubleshooting Common Issues
Here are some usual issues and simple ways to fix them
Problem: I can’t get to 192.168.10.1
- Make sure you’re on the Wavlink network
- Open a different browser or turn the device off and on again
Problem: Signal is weak or not present.
- Move the booster closer to the router.
- Check to see if walls or metal are blocking the signal.
Problem: Forgot setup login
- Press and hold the reset button for 10 seconds
- This will reset the repeater to factory settings
- Sometimes a quick reset solves the problem.
Final Words
Wavlink range extender setup is easy when you follow the right steps. Whether you use the web method or the WPS button, both are simple. Once it’s set up, your Wavlink repeater will let you enjoy strong WiFi in every room.


 Wifi Wavlink


